
はじめに
Ubuntuを使ったWEBサーバーの構築方法です。
以前、Raspberry Pi(以下ラズパイと記載)を使ったWEBサーバーの構築方法を紹介していますが、実際にもーろぐ2(https://mini.mohlog.com)を運用するにあたり、ラズパイではなく、PC+OSとしてUbuntu Serverを使用することとしたため、それにあわせて記事を書き直しています。

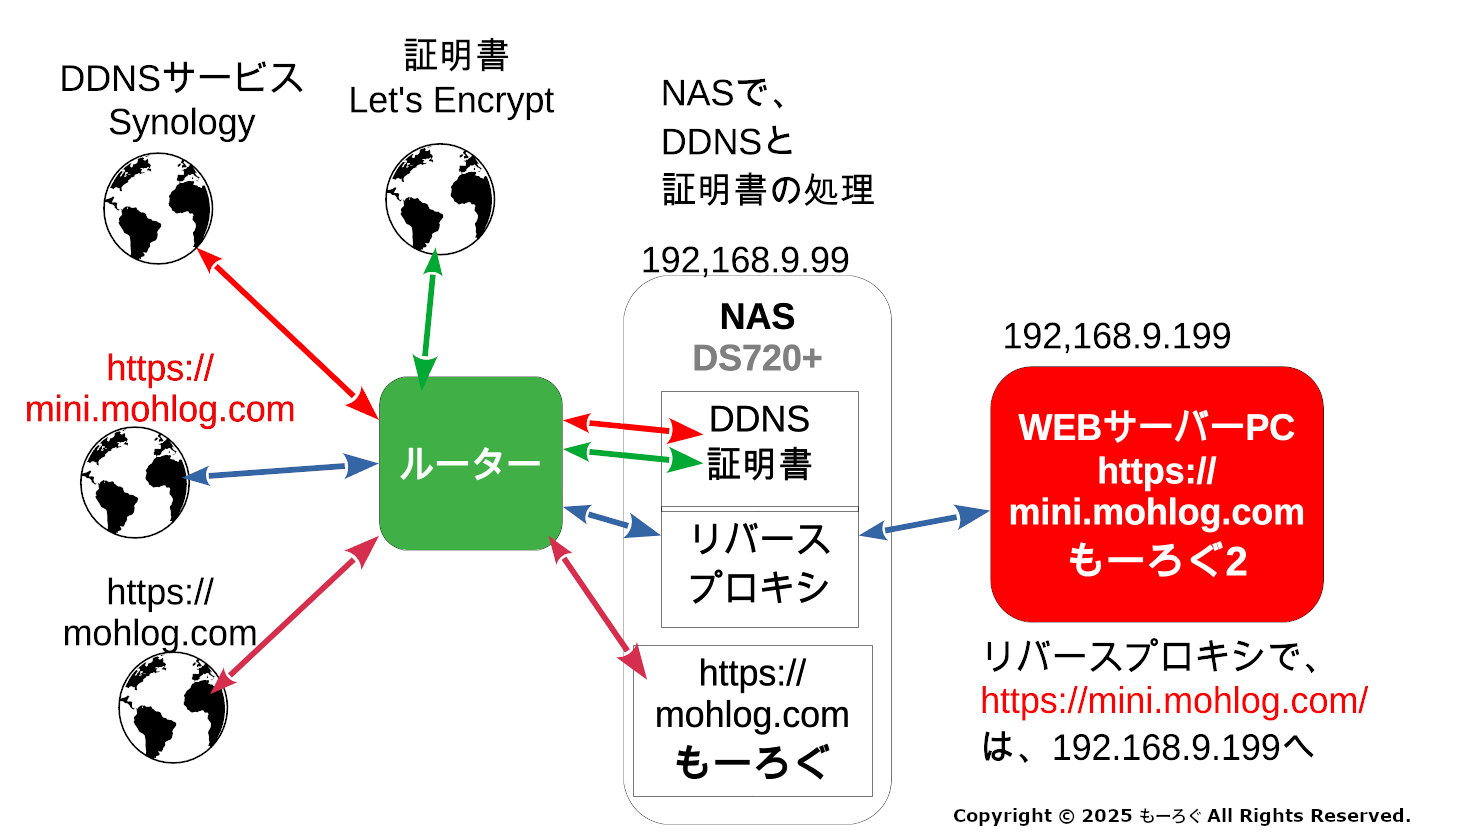
こちらも、SynologyのNASでリバースプロキシを構成して動かしています。
使用した機器とOS、各設定情報
- PC:MeLE Quieter 3C Intel N5105 メモリ8GB(のちにQuieter 4C Intel N100 メモリ8GBへ変更)
- ストレージ:2.5インチサイズSSD 2個
- SATA - USB変換ケーブル 2個
- LANケーブル
- OS:Ubuntu Server 24.04.02 LTS
- URL:mini.mohlog.com
- IPアドレス(WEBサーバー):192.168.9.199
- IPアドレス(リバースプロキシサーバー):192.168.9.99
RAID1へのUbuntu Serverのインストール と障害リハーサル
SSDの故障と寿命を考え、冗長性をもたせるため、RAID1を構築し、そこにUbuntu Serverをインストールしました。
運用中に障害が発生したとき慌てないように、リハーサルもしておきます。
RAID1へのUbuntu Serverのインストール

起動、アップデート
起動して、アップデートしておきます。
sudo apt update
sudo apt upgrade
固定IPアドレス
/etc/netplan/ に、70-fixed-ip.yamlというファイルを作って、反映させます。
sudo nano 70-fixed-ip.yaml
枠内を記載
network:
    version: 2
    ethernets:
      enp1s0:
        dhcp4: false
        addresses:
        - 192.168.9.199/24
        nameservers:
          addresses:
            - 192.168.9.1
            - 8.8.8.8
            - 1.1.1.1
          search: []
        routes:
        - to: default
          via: 192.168.9.1
enp1s0は、使用するハードでかわってきます。コマンド「ip a」などで確認できます。
青字のIPアドレスは、ご自分の環境にあわせて変更ください。
sudo netplan apply
RAID1 Ubuntu Server障害発生リハーサル
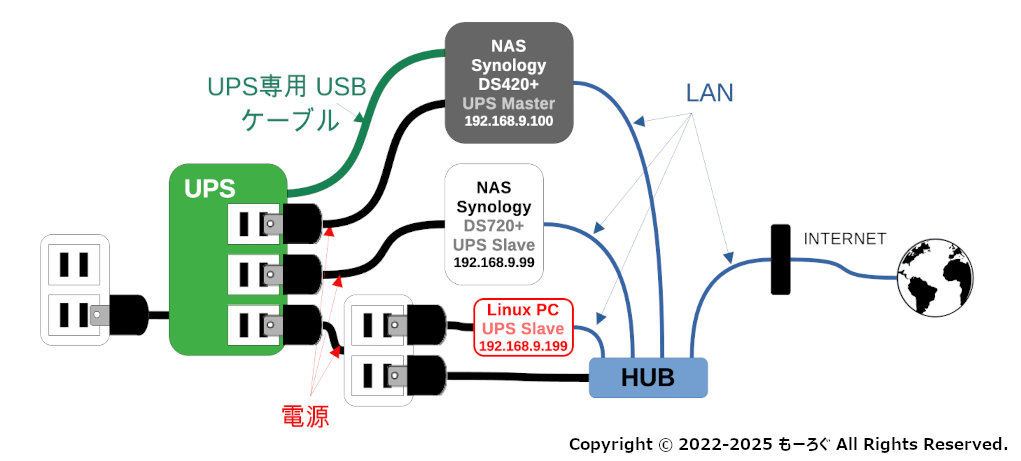
UPS(無停電電源)への接続
突然の停電で、データ消失しないように、UPS(無停電電源)に接続します。
すでに1台のUPSに2台のNASが接続された状態で運用しています。
ここにネットワークUPSで今回のPC(下図では「Linux PC」と表現)を接続します。

WEBサーバー関係ソフトウェアのインストール その1
Apache2のインストールと設定
Apache2のインストール
sudo apt install apache2
インストール後、Google ChromeなどのWebブラウザから、http://192.168.9.199(PCのIPアドレス)にアクセスし、以下画面がでればApache2が稼働をはじめています。

security.conf 設定変更
sudo nano /etc/apache2/conf-enabled/security.conf
サーバーのOSやApacheのバージョン、モジュール情報など、余計なものを表示しないように設定します。
# 12行目 : 変更
変更前:ServerTokens OS
変更後:ServerTokens Prod
dir.conf 設定変更
sudo nano /etc/apache2/mods-enabled/dir.conf
# index.phpを先頭に移動して、優先順位を1番に変更。
変更前:DirectoryIndex index.html index.cgi index.pl index.php index.xhtml index.htm
変更後:DirectoryIndex index.php index.html index.cgi index.pl index.xhtml index.htm
バーチャルホスト設定
同じサーバーで、複数のドメイン(サブドメインも)を運用できるようにします。
デフォルト設定をコピーして編集します。
httpとhttps用の2つを作成します。
sudo cp /etc/apache2/sites-available/000-default.conf /etc/apache2/sites-available/minimohlog.conf
sudo nano /etc/apache2/sites-available/minimohlog.conf
# 赤字部分を追加、変更
<VirtualHost *:80>
        # The ServerName directive sets the request scheme, hostname and port that
        # the server uses to identify itself. This is used when creating
        # redirection URLs. In the context of virtual hosts, the ServerName
        # specifies what hostname must appear in the request's Host: header to
        # match this virtual host. For the default virtual host (this file) this
        # value is not decisive as it is used as a last resort host regardless.
        # However, you must set it for any further virtual host explicitly.
        #ServerName www.example.com
        ServerName mini.mohlog.com #追加
        ServerAdmin webmaster@localhost
        #DocumentRoot /var/www/html #コメントアウト
        DocumentRoot /var/www/minimohlog #追加
        # Available loglevels: trace8, ..., trace1, debug, info, notice, warn,
        # error, crit, alert, emerg.
        # It is also possible to configure the loglevel for particular
        # modules, e.g.
        #LogLevel info ssl:warn

        #ErrorLog ${APACHE_LOG_DIR}/error.log #コメントアウト
        #CustomLog ${APACHE_LOG_DIR}/access.log combined #コメントアウト
        ErrorLog ${APACHE_LOG_DIR}/error_minimohlog.log #追加
        CustomLog ${APACHE_LOG_DIR}/access_minimohlog.log combined #追加

        # For most configuration files from conf-available/, which are
        # enabled or disabled at a global level, it is possible to
        # include a line for only one particular virtual host. For example the
        # following line enables the CGI configuration for this host only
        # after it has been globally disabled with "a2disconf".
        #Include conf-available/serve-cgi-bin.conf
</VirtualHost>sudo cp /etc/apache2/sites-available/default-ssl.conf /etc/apache2/sites-available/minimohlog-ssl.conf
sudo nano /etc/apache2/sites-available/minimohlog-ssl.conf
# 赤字部分を追加、変更
<VirtualHost *:443>
        ServerAdmin webmaster@localhost
        ServerName mini.mohlog.com #追加
        #DocumentRoot /var/www/html #コメントアウト
        DocumentRoot /var/www/minimohlog #追加

        # Available loglevels: trace8, ..., trace1, debug, info, notice, warn,
        # error, crit, alert, emerg.
        # It is also possible to configure the loglevel for particular
        # modules, e.g.
        #LogLevel info ssl:warn

        #ErrorLog ${APACHE_LOG_DIR}/error.log #コメントアウト
        #CustomLog ${APACHE_LOG_DIR}/access.log combined #コメントアウト
        ErrorLog ${APACHE_LOG_DIR}/error_minimohlog.log #追加
        CustomLog ${APACHE_LOG_DIR}/access_minimohlog.log combined #追加

        # For most configuration files from conf-available/, which are
        # enabled or disabled at a global level, it is possible to
        # include a line for only one particular virtual host. For example the
        # following line enables the CGI configuration for this host only
        # after it has been globally disabled with "a2disconf".
        #Include conf-available/serve-cgi-bin.conf

        #   SSL Engine Switch:
        #   Enable/Disable SSL for this virtual host.
        SSLEngine on

        #   A self-signed (snakeoil) certificate can be created by installing
        #   the ssl-cert package. See
        #   /usr/share/doc/apache2/README.Debian.gz for more info.
        #   If both key and certificate are stored in the same file, only the
        #   SSLCertificateFile directive is needed.
        SSLCertificateFile      /etc/ssl/certs/ssl-cert-snakeoil.pem
        SSLCertificateKeyFile   /etc/ssl/private/ssl-cert-snakeoil.key
・・・
バーチャルホストの有効化
sudo a2ensite minimohlog
mohlog@qe3csvr:~ $ sudo a2ensite minimohlog
Enabling site minimohlog.
To activate the new configuration, you need to run:
systemctl reload apache2sudo a2ensite minimohlog-ssl
mohlog@qe3csvr:~ $ sudo a2ensite minimohlog-ssl
Enabling site minimohlog-ssl.
To activate the new configuration, you need to run:
  systemctl reload apache2
sslの有効化
httpsでアクセスできるように、sslを有効化します。通常WEBサーバーで証明書を取得/設定が必要なのですが、今回はSynology NASのリバースプロキシを使うため、証明書の取得/設定もSynology NAS側で行います。(設定方法は後述)
この方が、証明書の更新・管理が圧倒的に楽です。
sudo a2enmod ssl
mohlog@qe3csvr:~ $ sudo a2enmod ssl
Considering dependency setenvif for ssl:
Module setenvif already enabled
Considering dependency mime for ssl:
Module mime already enabled
Considering dependency socache_shmcb for ssl:
Enabling module socache_shmcb.
Enabling module ssl.
See /usr/share/doc/apache2/README.Debian.gz on how to configure SSL and create self-signed certificates.
To activate the new configuration, you need to run:
  systemctl restart apache2
Apache2の再起動(ここまで設定した内容の反映)
sudo systemctl restart apache2
ここまで設定したら、Synology NASのリバースプロキシの設定にうつります。
Synology NASの設定
リバースプロキシ設定
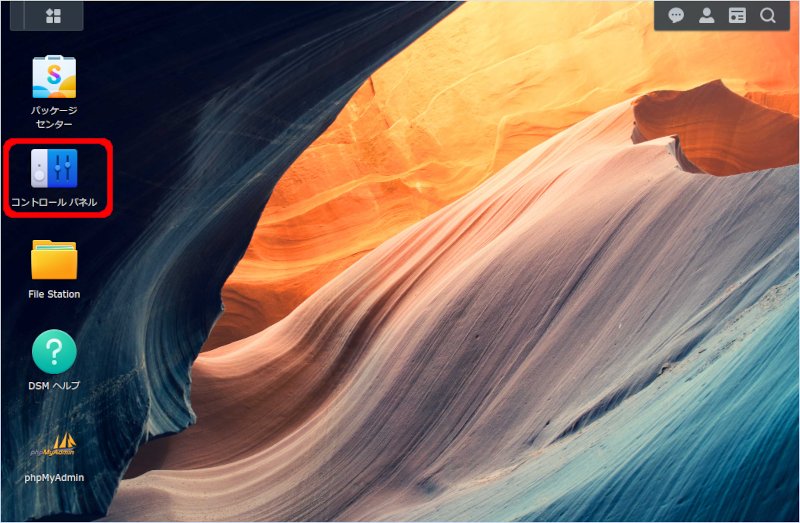
Synology NASのDSMにアクセスし、「コントロールパネル」 を開きます。

「ログインポータル」を開きます。
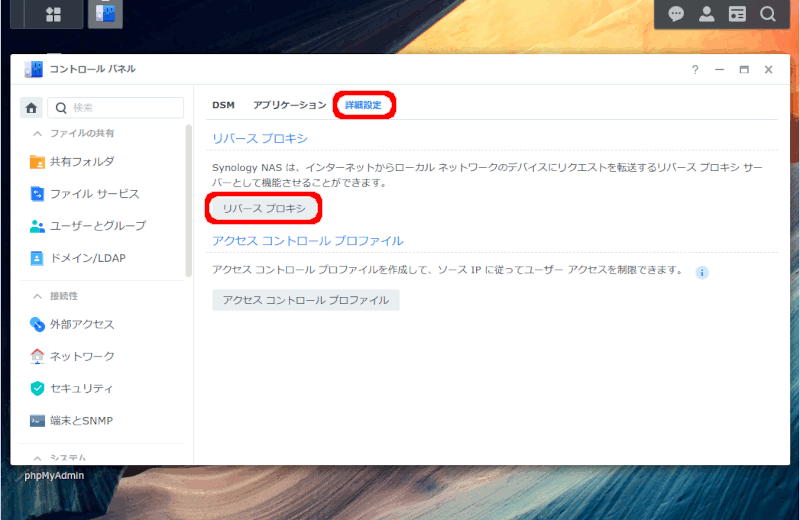
「詳細設定」タブを選択して、
「リバース プロキシ」をクリックします。
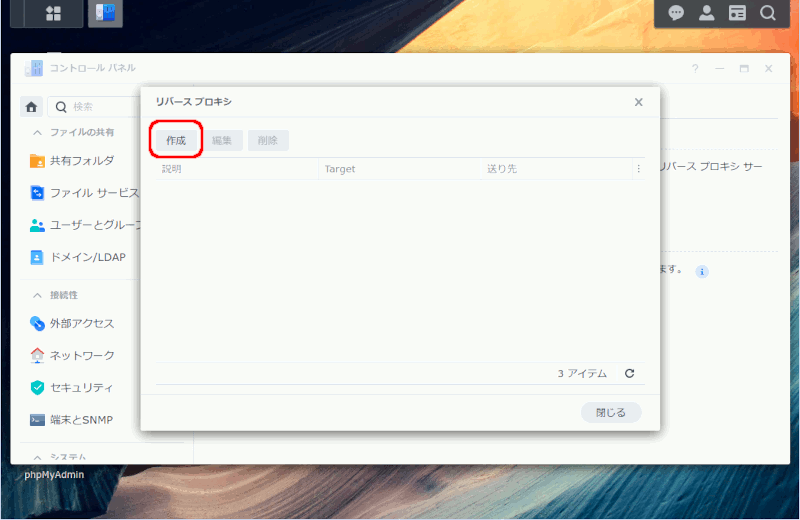
「作成」をクリック

「全般」タブで、設定を入力します。
「プロキシ名を反転:」は、言葉がおかしいですが、この設定の名称です。
Targetの「ホスト名:」と、送り先の「ホスト名:」を、ご使用の環境にあわせて変更し、他は画像と同じ設定で良いです。
入力したら、「保存」をクリックして、保存します。

設定がリストに表示されれば、OKです。
今回、リバースプロキシの設定は、送り先プロトコルHTTPS、ポート443としましたが、送り先のプロトコルをHTTP、ポートを80とすることも可能です。
その場合は、WordPressの設定ファイル、”wp-config.php"に、以下赤字を追加します。
* @package WordPress
 */
define('FORCE_SSL_ADMIN', true);
if ( ! empty( $_SERVER['HTTP_X_FORWARDED_PROTO'] ) && $_SERVER['HTTP_X_FORWARDED_PROTO'] == 'https' ) {
       $_SERVER['HTTPS']='on';
}今回は、カスタムヘッダーの設定をしていません。
何が起きるかといえば、WEBサーバーへのアクセスが、常にプロキシサーバーであるSynology NASのIPアドレスになります。そのため、IPアドレスでのアクセス制限が働きません。
ご注意ください。
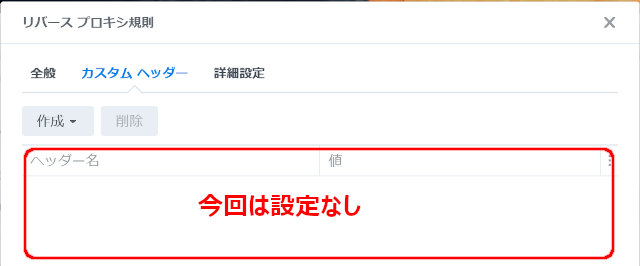
カスタムヘッダーの設定はこちらの記事を参照ください。

証明書
サイトにhttpsで接続するために、証明書の発行と設定が必要です。WEBサーバーにしたPC側で設定する方法もありますが、今回は、更新・管理が楽な、SynologyNAS側で設定します。
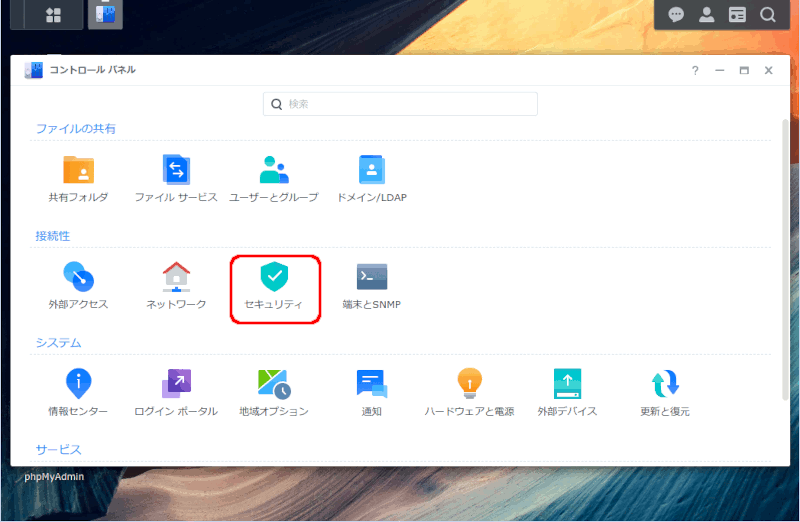
コントロールパネルから、「セキュリティ」を開きます。
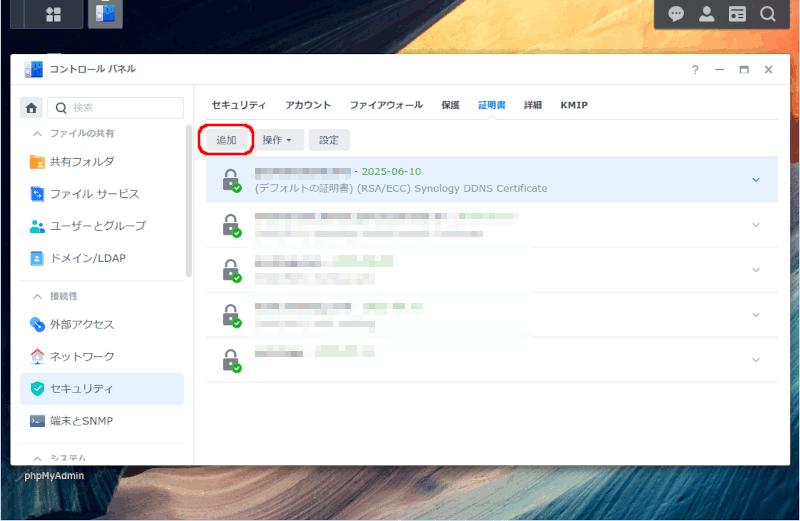
「追加」をクリック
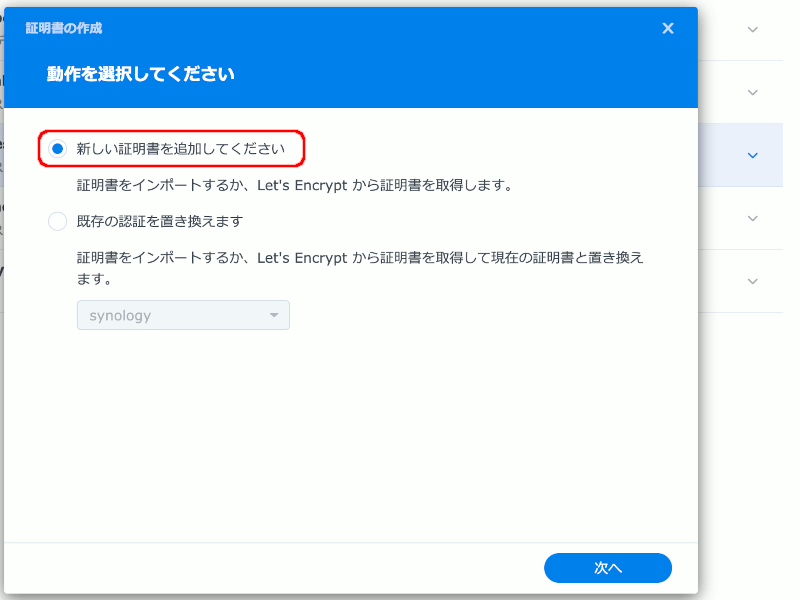
「新しい証明書を追加してください」を選択して、次へ。

「説明:」には適当な名称を入れます。
「Let's Encryptからの証明書をお受け取りください」を選択し、次へ。

「ドメイン名:」欄には、運用するサイトのドメイン名(mini.mohlog.com)を、
「電子メール:」に、Synology NASに設定してあるメールアドレスから選択
「完了」をクリックします。

証明書の取得には、数秒から数分かかります。
成功すると、リストに証明書が追加表示されます。

このあと、運用するサイトにこの証明書を適用します。
「設定」をクリックして、

運用するドメイン名を見つけて、リストから取得した証明書を選択。
「OK」でをクリックして完了です。
これで、Synology NAS側での設定は終了です。
証明書は90日後に期限となり、更新が必要ですが、Synology NASが自動でやってくれます。
おおよそ期限1か月を切ったころに更新されます。
WEBサーバー関係ソフトウェアのインストール その1
Apache2の動作テスト
Apache2のバーチャルホスト設定がうまくできているか、確認します。
確認用のページを作成して、それが表示されるかどうかで確認とします。
minimohlog用のディレクトリを作って、デフォルトのindex.htmlをコピー
sudo mkdir /var/www/minimohlog/
sudo cp /var/www/html/index.html /var/www/minimohlog/index.html
sudo chown -R www-data:www-data /var/www/minimohlog/
コピーしたindex.htmlを少し変更
デフォルトとの区別がつくように、コピーしたindex.htmlを少し変更します。
sudo nano /var/www/minimohlog/index.html
今回は、
変更前:Apache2 Default Page
変更後:Apache2 minimohlog Page
としました。タイトル部分と本文部分の2ヶ所変更してます。
うまくバーチャルホストの設定ができていれば、ブラウザで、https://mini.mohlog.com へアクセスすると、 /var/www/minimohlog/にある、変更後のindex.htmlが表示されます。

うまくバーチャルホストの設定ができていない場合は、/var/www/http/にある、デフォルトのindex.htmlが表示されます。

rewriteモジュールの追加
これを忘れると、WordPressでパーマリンク構造の変更ができないなどの不具合がでます。
「更新に失敗しました。返答が正しいJSONレスポンスではありません。」とエラーが出たりします。

sudo a2enmod rewrite
mohlog@qe3csvr: $~ sudo a2enmod rewrite
Enabling module rewrite.
To activate the new configuration, you need to run:
systemctl restart apache2あわせて、apache2.confを変更します。
sudo nano /etc/apache2/apache2.conf
<Directory /var/www/>にある赤字部分を変更します。
変更前:AllowOverride None
変更後:AllowOverride All
・・・
<Directory /var/www/>
Options Indexes FollowSymLinks
	AllowOverride All
Require all granted
</Diectory>
・・・
Apache2を再起動します。
sudo systemctl restart apache2
PHP関連のインストール
PHPのインストール
sudo apt install php php-mbstring php-pear
mohlog@qe3csvr:~ $ sudo apt install php php-mbstring php-pear
mohlog@qe3csvr:~ $ sudo php -v #バージョンの確認
PHP 8.3.6 (cli) (built: Mar 19 2025 10:08:38) (NTS)
Copyright (c) The PHP Group
Zend Engine v4.3.6, Copyright (c) Zend Technologies
    with Zend OPcache v8.3.6, Copyright (c), by Zend Technologies
PHP-FPM のインストールと、Apache2で有効化
今回PHPのバージョンが8.3.*だったため、php8.3-fpmになります。
PHPのバージョンにより読み替えてください。
sudo apt install php8.3-fpm
sudo a2enmod proxy_fcgi setenvif
sudo a2enconf php8.3-fpm
sudo systemctl restart php8.3-fpm apache2
mohlog@mohpi:~ $ sudo apt install php8.3-fpm
mohlog@mohpi:~ $ sudo a2enmod proxy_fcgi setenvif
Considering dependency proxy for proxy_fcgi:
Enabling module proxy.
Enabling module proxy_fcgi.
Module setenvif already enabled
To activate the new configuration, you need to run:
  systemctl restart apache2
mohlog@mohpi:~ $ sudo a2enconf php8.3-fpm
Enabling conf php8.3-fpm.
To activate the new configuration, you need to run:
  systemctl reload apache2
mohlog@mohpi:~ $ sudo systemctl restart php8.3-fpm apache2
確認用のファイルを作成します。
sudo nano /var/www/minimohlog/info.php
内容はこれだけ
<?php phpinfo(); ?>https://mini.mohlog.com/info.phpにWebブラウザでアクセスし、Server APIの欄に、「FPM/FastCGI」と表示されればOKです。

そのほかのPHPモジュールのインストール
以下をインストールします。
- php-curl
- php-imagick
- php-zip
- php-intl
- php-common
- php-gd
- php-mysql
- php-enchant hunspell
sudo apt install php-curl php-imagick php-zip php-intl php-common php-gd php-mysql php-enchant hunspell
WordPress用PHP設定
WordPress用にPHPを設定します。
sudo nano /etc/php/8.3/fpm/pool.d/www.conf
最終行に赤字を追加します。サーバーとしたPCはメモリ8GBを積んで余裕があるので、memory_limitを512MBbにしてます。
・・・
;; 最終行に追記 PCのメモリサイズや WordPress の使用状況に応じて調整
php_value[max_execution_time] = 600
php_value[memory_limit] = 512M
php_value[post_max_size] = 512M
php_value[upload_max_filesize] = 256M
php_value[max_input_time] = 600
php_value[max_input_vars] = 2000
php_value[date.timezone] = Asia/Tokyo
php-fpmを再読み込みします。
sudo systemctl reload php8.3-fpm
MariaDBのインストールと初期設定
MariaDBのインストール
sudo apt install mariadb-server
念のため、扱う文字コードの設定がどうなっているかを確認しておきます。
絵文字等 4バイト長の文字を扱う場合は 「utf8mb4」とする必要があります。
sudo nano /etc/mysql/mariadb.conf.d/50-server.cnf
95,96行めあたりです。青字といっしょなら変更不要。
・・・
character-set-server  = utf8mb4
collation-server      = utf8mb4_general_ci
設定を変更した場合は、MariaDBの再起動をします。
sudo systemctl restart mariadb
MariaDBの初期設定
コマンドに「secure_insutallation」とあるので、初期設定というのかインストールのようなものですね。
sudo mysql_secure_installation
途中質問があります。赤字のように入力してます。
mohlog@qe3csvr:~ $ sudo mysql_secure_installation

NOTE: RUNNING ALL PARTS OF THIS SCRIPT IS RECOMMENDED FOR ALL MariaDB
      SERVERS IN PRODUCTION USE!  PLEASE READ EACH STEP CAREFULLY!

In order to log into MariaDB to secure it, we'll need the current
password for the root user. If you've just installed MariaDB, and
haven't set the root password yet, you should just press enter here.

Enter current password for root (enter for none): [ENTER]
OK, successfully used password, moving on...

Setting the root password or using the unix_socket ensures that nobody
can log into the MariaDB root user without the proper authorisation.

You already have your root account protected, so you can safely answer 'n'.

Switch to unix_socket authentication [Y/n] n
 ... skipping.

You already have your root account protected, so you can safely answer 'n'.
Change the root password? [Y/n] n
 ... skipping.

By default, a MariaDB installation has an anonymous user, allowing anyone
to log into MariaDB without having to have a user account created for
them.  This is intended only for testing, and to make the installation
go a bit smoother.  You should remove them before moving into a
production environment.

Remove anonymous users? [Y/n] y
 ... Success!

Normally, root should only be allowed to connect from 'localhost'.  This
ensures that someone cannot guess at the root password from the network.

Disallow root login remotely? [Y/n] y
 ... Success!

By default, MariaDB comes with a database named 'test' that anyone can
access.  This is also intended only for testing, and should be removed
before moving into a production environment.

Remove test database and access to it? [Y/n] y
 - Dropping test database...
 ... Success!
 - Removing privileges on test database...
 ... Success!

Reloading the privilege tables will ensure that all changes made so far
will take effect immediately.

Reload privilege tables now? [Y/n] y
 ... Success!

Cleaning up...

All done!  If you've completed all of the above steps, your MariaDB
installation should now be secure.

Thanks for using MariaDB!
WordPress用データベースの作成
今回は、
- データベース名:db_minimohlog
- ユーザー名:mohlog
- パスワード:abcd1234
としています。
sudo mysql
mohlog@qe3csvr:~ $ sudo mysql
Welcome to the MariaDB monitor.  Commands end with ; or \g.
Your MariaDB connection id is 1460
Server version: 10.11.13-MariaDB-0ubuntu0.24.04.1 Ubuntu 24.04

Copyright (c) 2000, 2018, Oracle, MariaDB Corporation Ab and others.

Type 'help;' or '\h' for help. Type '\c' to clear the current input statement.

MariaDB [(none)]> create database db_minimohlog;
Query OK, 1 row affected (0.001 sec)

MariaDB [(none)]> grant all privileges on db_minimohlog.* to mohlog identified by 'abcd1234';
Query OK, 0 rows affected (0.002 sec)

MariaDB [(none)]>  exit
WordPressインストール
WordPressダウンロード
最新版をダウンロードします。
wget https://wordpress.org/latest.tar.gz
mohlog@mohpi:~ $ wget https://wordpress.org/latest.tar.gz
--2025-05-DD 20:40:56--  https://wordpress.org/latest.tar.gz
Resolving wordpress.org (wordpress.org)... 198.143.164.252
Connecting to wordpress.org (wordpress.org)|198.143.164.252|:443... connected.
HTTP request sent, awaiting response... 200 OK
Length: 26780969 (26M) [application/octet-stream]
Saving to: ‘latest.tar.gz’

latest.tar.gz                 100%[==============================================>]  25.54M  1.98MB/s    in 17s

2025-05-DD 20:41:14 (1.53 MB/s) - ‘latest.tar.gz’ saved [26780969/26780969]
解凍、アクセス権限の変更
sudo tar zxvf latest.tar.gz -C /var/www/
sudo chown -R www-data:www-data /var/www/wordpress
1行めで、/var/wwwに解凍。/var/www/wordpress ができるので、
2行めで、アクセス権限を www-data:www-data に変更します。
ディレクトリ(フォルダ)ごと差し替え
いま、mini.mohlog.com用のサイトデータは、/var/www/minimohlog に入れるように設定してますが、すでにテスト用データが入ってますので、これをディレクトリ(フォルダ)ごと差し替えます。
/var/www/minimohlog を名称変更して、/var/www/_minimohlog とし、
/var/www/wordpress を名称変更して、/var/www/minimohlog とします。
sudo mv /var/www/minimohlog /var/www/_minimohlog
sudo mv /var/www/wordpress /var/www/minimohlog
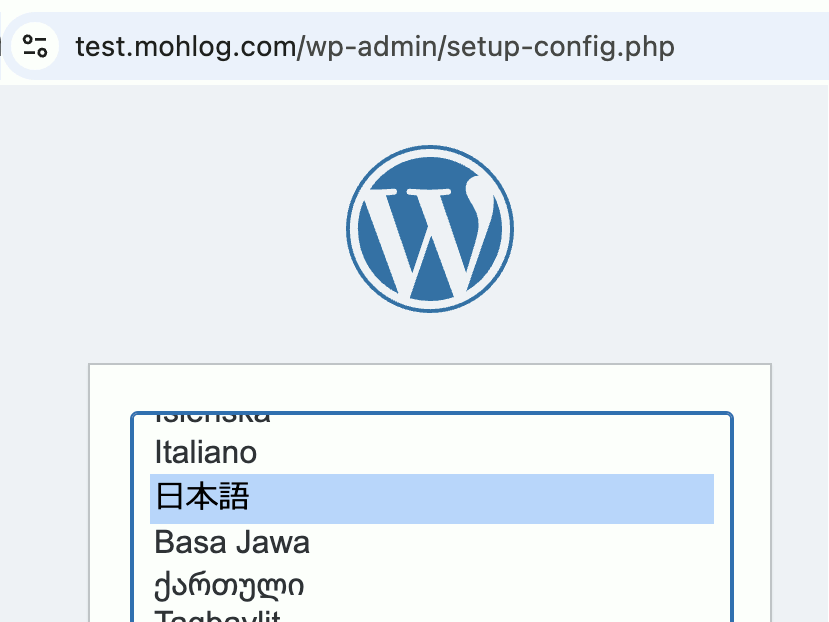
WordPress開始
https://mini.mohlog.comにアクセスすると、以下のインストール画面が表示され、表示される手順通りにWordPressの設定を行います。
最後に、テーマファイルやプラグインなどを、ftpソフト等を使用しなくとも直接WebブラウザからWordPressに読み込ませられるように、wp-config.phpを編集します。
sudo nano /var/www/minimohlog/wp-config.php
赤字を追加します。記載場所に指定があるので、そこに記載します。
86〜90行めあたりになります。
・・・
define( 'WP_DEBUG', false );

/* カスタム値は、この行と「編集が必要なのはここまでです」の行の間に追加してください。 */
define( 'FS_METHOD', 'direct' );


/* 編集が必要なのはここまでです ! WordPress でのパブリッシングをお楽しみください。 */
・・・おわりに
長文になりましたが、これでWordPressの準備ができました。
あとは記事を粛々と書いけばOKです。


コメント